

Banner and signage configurator
A banner and signage configurator turns a customer's typed width and height into a print-ready job: it works out how many panels a wide-format printer must tile, applies hems, grommets and pole pockets per edge, and adds bleed and finishing marks to every panel a sign shop's production line can run without manual rework.
Start a project brief Explore servicesReviewed by CEO, Netbase JSC · Published 1 Oct 2026 · Updated 1 Oct 2026

What does a banner configurator have to do?
A banner is rarely a standard size. A sign shop's customers ask for a specific width and height to fit a storefront, a trade-show booth or a fence line, so a configurator has to accept a typed size rather than a dropdown of fixed options. That decision cascades into three problems: the printer has a maximum roll width, so an oversized banner must be split into panels and reassembled on installation; the banner needs a way to attach to whatever it is mounted on, which is a finishing choice, not a printing choice; and the exported file has to carry bleed, registration and panel-overlap marks that production can read without re-measuring anything by hand. This page is one of the print-specific product pages in the web-to-print by print product family, and it covers the configurator and file mechanics for one product - a flexible printed banner or sign panel - not the pricing that sits behind it.
How does a custom size become a tile count?
Most wide-format printers have a fixed maximum print width, commonly around 1.6 m for a roll-fed machine, regardless of how long the job runs. When a customer's width exceeds that limit, the configurator has to split the artwork into panels, and it has to do the arithmetic before the customer ever sees a price or a proof.
Tile count = ceil(banner width ÷ (printer max width − overlap allowance))
- Printer max width is the widest material the shop's device can print, read from its own equipment profile rather than assumed.
- Overlap allowance is the strip of duplicated artwork at each seam, needed so an installer can align panels without a visible gap; it is subtracted from usable width per panel, not added to the finished size.
- Rounding up (ceil) matters, since a banner needing 2.3 panels still needs 3 physical pieces of material.
Worked example (illustrative only). A 3.6 m banner, a 1.6 m printer, a 50 mm overlap. Usable width per panel = 1.55 m. Tile count = ceil(3.6 ÷ 1.55) = 3 panels, joined at 2 seams.
| Banner width | Max panel width | Overlap | Tile count |
|---|---|---|---|
| 1.5 m | 1.6 m | 50 mm | 1 panel |
| 3.6 m | 1.6 m | 50 mm | 3 panels |
| 6.0 m | 1.6 m | 50 mm | 4 panels |
| 6.0 m | 3.2 m | 100 mm | 2 panels |
A configurator that skips this step will generate a single oversized file no printer in the shop can output, leaving an operator to split it manually - the exact step tiling logic exists to remove.
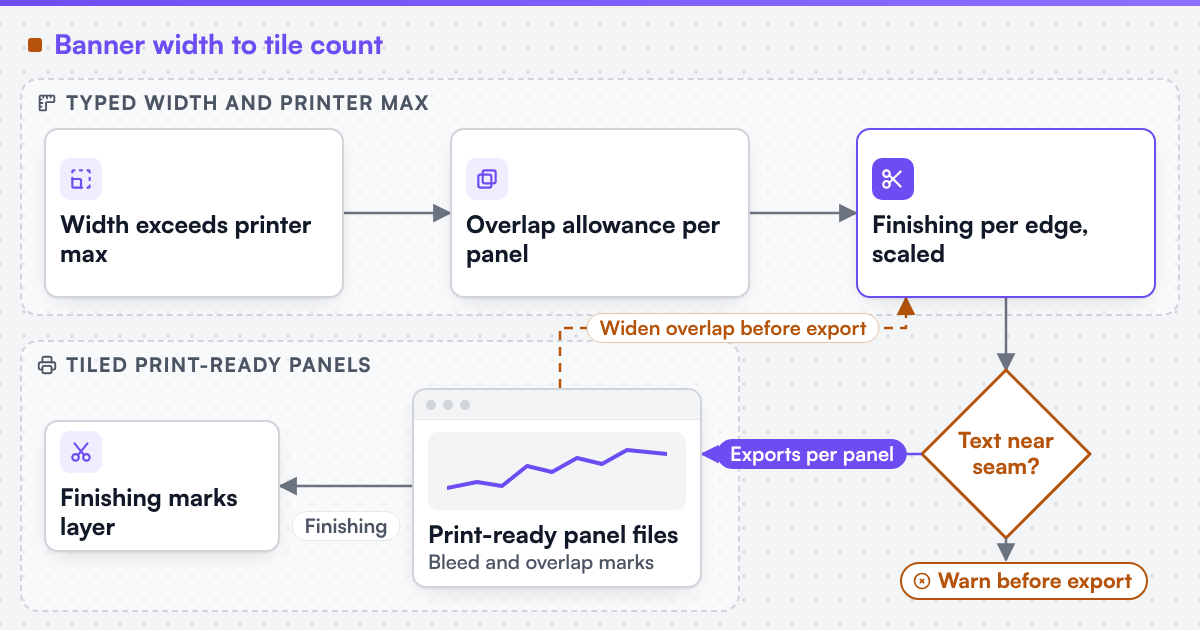 (opens the full-size diagram in a new tab)
What finishing choices does a sign shop actually offer?
Finishing is how a flat printed panel becomes a usable sign, and the options differ by how and where the banner will be mounted.
| Finishing | What it is | Typical placement rule |
|---|---|---|
| Hem | Folded, welded or sewn border edge against tearing and wind load | All four edges, or the two perpendicular to pole pockets |
| Grommet | Metal or plastic eyelet through the hem for rope, zip ties or S-hooks | Corners always; closer spacing on edges exposed to wind |
| Pole pocket | Sewn sleeve sized to slide over a pole or pipe | Top edge hanging; top and bottom between two poles |
| Hem only, no grommets | Reinforced edge with no attachment points | Edges meeting a frame track, not a rope or pole |
Finishing is a set of per-edge choices, not one global style, since an order commonly mixes them - a pole pocket on top, grommets on the rest. Grommet spacing should scale with banner size: four corner grommets suit a small sign but leave a 6 m banner billowing between widely spaced points, a production and liability problem, not a cosmetic one.
Why does character and image size have to scale with viewing distance?
A banner that reads clearly up close can be illegible from across a parking lot, and the reverse also wastes the space a customer paid for: oversized type on a banner meant for arm's-length viewing. The U.S. Access Board's accessibility design standards for signs, though written for wayfinding rather than banners, document the relationship precisely: required character height increases step-wise with horizontal viewing distance - a minimum 2-inch height up to 15 feet, increasing 1/8 inch per additional foot beyond that. A banner configurator does not have to enforce that exact rule, but it should apply the same principle: warn a customer who sets a small headline on a banner sized for distant viewing, rather than approving a layout that will not read.
What does a material choice change about the file?
Material decides which production method applies and what the configurator must validate. Vinyl (PVC-coated polyester or scrim) is the common outdoor default; it is opaque, so a double-sided banner needs two print passes or a blockout layer. Mesh lets wind through, reducing grommet and pole load outdoors, at the cost of usable image area - fine detail or small text should be flagged as likely to lose definition. Fabric (dye-sublimation polyester) suits indoor pop-ups and light boxes and needs its own colour profile, since dye-sub ink behaves differently from solvent or UV-curable ink on vinyl. Rigid board is not tiled like a roll material, since a sheet has a fixed maximum size set by the stock, not the printer. The configurator routes each material to the right file rules - opacity, colour profile, whether tiling applies - rather than presenting every material as a colour swatch on an identical template.
What does print-ready output need to include?
We can build custom product configurators and browser design tools that emit print-ready artwork to an agreed specification. For a banner job, the output is one file per panel: each carries its own bleed, its portion of any image spanning a seam, and a registration mark showing the overlap with the next panel. Finishing marks - hem cut lines, grommet placement dots, the pole pocket fold line - sit on a separate, labelled layer, so production sees where machinery or manual finishing acts, distinct from the artwork. A named colour profile describes the file target an engagement is built to produce, not a credential Web2Print Solutions holds. The configurator and tiling logic is engineering built into a print product configurator; pricing a custom size and finishing combination is covered separately in you cannot price a custom size online; and the preflight and colour conversion behind the exported files is print-ready PDF and prepress automation. Netbase JSC, which operates Web2Print Solutions, has delivered 50+ web-to-print platforms, and reusable configurator components that handle custom-size tiling and per-edge finishing are available under their own licence terms.
Scope a banner and signage build in a project brief: the sizes and materials you print today, your printer's maximum width, and which finishing options - hems, grommets, pole pockets - your shop actually offers.
Key takeaways
- Tile count follows ceil(banner width ÷ (printer max width − overlap allowance)); rounding up matters because a partial panel still needs full material.
- Finishing - hems, grommets and pole pockets - should be configurable per edge, since real orders commonly mix them rather than applying one style to the whole banner.
- Grommet spacing should scale with banner size, not stay at a fixed count, since a large banner needs more attachment points to resist wind load.
- Character and image size should be checked against the banner's intended viewing distance, the same principle documented in the U.S. Access Board's sign legibility standards.
- Print-ready output is one file per panel, each with its own bleed and overlap registration, plus a separate finishing-marks layer for cutting, grommets and pole pockets.
Discuss your web-to-print project
Frequently asked questions
No. A banner narrower than the printer's maximum width prints as a single panel; tiling only applies once the requested width exceeds that limit, through the same size logic rather than a separate flow.
Yes, and it is common - a pole pocket on top for hanging, grommets on the rest for extra securing points. Finishing should be a per-edge choice, not one banner-wide style.
The configurator should warn before export, since even a well-aligned overlap can make text spanning a seam harder to read once installed. Shifting the design or widening the overlap are reasonable fixes, decided by the shop, not applied silently.
References (3)
- U.S. Access Board, Guide to the ADA Accessibility Standards, Chapter 7: Signs (character height to viewing distance), accessed 2026-10-01.
- International Color Consortium, ICC profiles, accessed 2026-10-01.
- W3C, Scalable Vector Graphics (SVG) 2, accessed 2026-10-01.